Pages

Tuesday, March 29, 2011

Our Laminate Floor is (Finally) Here!

One week from our order date, we got a call from Home Depot saying that they had our laminate flooring at the store. That was great news, because at first they told us it was going to take at least two weeks for us to get our flooring.

The laminate floor boxes were pretty heavy, so it was a good thing that we found some shopping trolleys in the parking lot. Instead of having to take the boxes one by one, we hauled six at a time with these babies.


Let me zoom in on one part of the scene above.


Vee has done this at least twice, taking off his gloves and leaving them where he last put his hands. They look a little creepy, like they come alive when you're not looking.

By the way, you know those grocery stores with trolleys that automatically lock their wheels once you're a certain distance away from the store? Apparently, they lie because we see some of those "locking" trolleys in the parking lot and they work fine.

Anyway, this is what our new floor looks like. It's called Oslo Walnut from Beaulieu Canada. It's a nice medium brown and so far we're really happy with our decision.


But our laminate-floor-shopping experience was a saga.

First, the cheapskates that we were, we liked the 97-cent-per-square-feet laminates with nice pattern and coloring.

Then, after talking to a flooring specialist at a Home Depot store and getting some advice on choosing laminates, we decided on a 2.99-bucks-per-square-feet product with attached foam underlayment. Also, there was a 10-percent-off promotion for flooring products and 10-percent-off promotion for the first purchase on new Home Depot cards. In total, we got 19 percent off and also saved a little because we didn't having to buy a separate underlayment.

Then, our building manager said he wanted at least a certain level of soundproofing. We went back to Home Depot and found out that:
1. the laminate product we ordered did not have the required level of soundproofing in the attached underlayment.
2. we had to get the most expensive underlayment product in the store to get that kind of soundproofing.
3. we couldn't just add the soundproofing product under the said laminate because the attached underlayment would make the floor unstable.
4. therefore, we had to cancel our original order and choose another product.
5. the product we finally decided to buy instead had to be special-ordered and could take up to three weeks to arrive.
6. therefore, we might have to live on concrete sub-floor for a few days while we wait for the laminates to arrive.
7. Home Depot was going to honor our 19-percent discount again because it was the last day of the promotion on the flooring products and even though it wasn't technically our first purchase. This was the huge silver lining in the horrible shopping trip that it was.

But now that our new laminates are here, only about one week from the order date, we've almost forgotten all about the buying process. We're just happy we don't have to live on concrete because we can at least finish the flooring in one room before moving in. And it turned out for the best, because a friend offered to help deliver these boxes to our apartment (saving us $60 in delivery) and we spent the one-week wait time stripping and cleaning the concrete sub-floor anyway.

Monday, March 28, 2011

Stripped!

The floor, that is. It's bare now.

We used to have nasty old carpet all over most of the apartment.


When we came to see the apartment before actually making an offer, we saw that the carpet was already peeling off the floor in one corner. True enough, it was quite easy to pull the carpet off. It was what came after that wasn't so easy. But let's start from the beginning.

We first cut a section of the carpet with a utility knife so it's easier to manage...


Then pulled it off the walls and floor...


And rolled it up.


Then we did the same thing with the foam padding that was underneath the carpet.


And now the concrete sub-floor was visible. See the roll of carpet that's in front in the photo above? It was too long so I had to use a utility knife to cut it in half. That was actually harder than just cutting it before rolling it up.

And see all the stains on the carpet? That's why I vowed, then and there, never to install carpet in any of my future homes. We had to wear a mask because of all the dust that was trapped in the carpet. And dust mites were probably flying all over the place, too, when we were flinging all that old carpet around. *shudder*

Creepy invisible critters probably hiding in  your carpet.

Anyway, the other difficult thing was removing the tack strips around the room. These were the wooden strips that held the carpet in place. Vee used a hammer, a chisel and a pry bar to remove them. Then he used the back of the hammer to remove any tacks left in the concrete. The tacks left little holes in the concrete (experts in DIY forums call them "divots", apparently). But we're going to cover the holes with new flooring anyway, so it doesn't really matter.


Those tacks looked really, really sharp and scary, by the way.


I freaked out a little every time I saw these strips, just as I do every time I see anything sharp. I blame Final Destination for the mental images in my head of flying sharp things trying to kill people. More than once I had the image of an inanimate object deliberately tripping me and me falling, head-first, onto those tacks. Damn you, Final Destination. *shake fist*

Anyway, I then removed the baseboards on the walls. This was actually pretty easy. I first used a utility knife to separate the baseboard from the wall if any paint was in the crack.


Then, I stuck a putty knife in the crack between the baseboard and the wall and wiggled it around to separate the baseboard from the wall. When there was enough space, I wedged a pry bar in the crack and pulled outward at an angle. I started at one end of the wall and slowly moved to the other end. This was pretty easy and was actually rather fun.


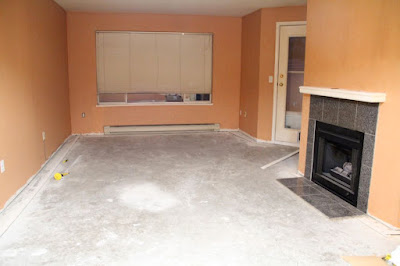
And finally, the floor was stripped down to its birthday suit.


That took about a whole week to finish, since we had work to do. One day, Vee went there early and said he got a surprise for me. Turned out he stripped the tiled portion all by himself with a pry bar. He had a hammer and a chisel, too, but turned out the tiles were pretty easy to remove for my stalwart, hard-as-nails hunk of a man.


A little background. We used to have a weird tiled patch on the floor in the entryway to our apartment. The door at the top left corner of the photo leads to the apartment hallway. The door on the left side of the photo leads to the bathroom and the floor is vinyl there. The top right corner is the kitchen with vinyl floor. And the gray line at the bottom right corner of the photo marked where the tile ended and the carpet begun. So it was just this small section that was tiled. And it bugged the hell out of both of us because it was so weird and awkward.

But anyway, they're all gone now, so we're happy. Good riddance, tiles and carpet!

How I Fixed Our Toilet Leak by Myself

It seems like I spoke too soon when I said we had no more leak in our toilet after we removed the old one and installed a shiny new one.

Yep. It leaked.

See the puddle of water on the floor?

But I managed to fix the leak. By myself, no less. *grin*

We first thought the leak wasn't from the toilet, but from the water supply pipe in the wall behind the toilet (visible in the background of the photo above, to the left of the toilet itself). We were already thinking of calling someone we knew who was in construction to help us with it. Nothing scares us more than plumbing problems.

But then, with the old toilet, it never leaked unless someone flushed. And we didn't flush the new toilet all night because we hadn't even moved in. And yet here we were, with a puddle of water on the floor. So it couldn't have been the pipe.

Then, Vee turned off the water supply valve...

 
And when he checked the toilet again, the floor was flooded and the tank was empty. We found our culprit! Turned out we didn't tighten the bolts and nuts that connected the tank to the bowl enough. A quick poke at the bolts revealed that one of them was wet.

So Vee tightened the loose bolt, turned on the water and let the tank fill up. He turned the water supply off again and we went out for dinner. When we got back, the floor was flooded and the tank was empty again. But we were tired, so we went to sleep and left the problem for another day.

While Vee was at work yesterday, I decided to fix the leak. I didn't take any pictures because I was worried I was going to drop the toilet tank the whole time and didn't want any distraction. Plus, we had just moved at that time and I couldn't find my camera's memory card.

But for illustrative purposes, here's what the problem bolts look like.


Basically, I removed the tank and placed it on the vanity. I removed the bolts and then put them back on again. I poured a cup of water into the tank and checked for any leaks. When I was satisfied with how tight the bolts were, I then placed the tank back on the toilet base.

Now we have a leak-free toilet! And I didn't drop the tank even once! Yay me!

Wednesday, March 23, 2011

How Our Magical Toilet Got a Guy in Rona All Worried

I never thought I'd use the words "toilet" and "magical" in the same sentence, but hey, there's a first time for everything, right?

Look at this toilet.


Looks innocent enough, yea? That's what we thought, too.

But during our home inspection, we found out that it was leaking. It was a good thing that we planned to have two weeks in which we'd have both the rental and the new apartment. We (correctly) thought that it might take some time to prepare the space and move in. Otherwise, we'd have had to sneak to the 24-hour cafe two blocks away every time we needed to use the bathroom.

And for the first five days since we got the keys, that was what we did. Many times, we chose to hold it in until it was lunch/dinner time or until we were done for the day. We also minimized our liquid intake whenever we were there doing renovations. It wasn't very fun.

We started trying to change the toilet on Day 2. Note the usage of the word "trying". We managed to remove the old leaky toilet and we only had a hole in the ground the same day.


But we found something unexpected there. The online videos and tutorials we saw did not say anything about the flange (the metal ring on the floor) being covered by a bendable metal thing.

A bendable metal ring on the toilet flange. Hole censored 'cos it's kinda gross...okay, really gross.
 
So we went to the nearest Rona and got some advice from a middle-aged gentleman who worked there. Turned out the bendable metal thing was a pipe for funneling the stuff from the toilet down into the hole. And we weren't supposed to touch it. Good thing we went to Rona; Vee almost decided to remove it because he thought it was just something that came with the old toilet!

Before we left the home improvement store, the man who helped us put his hand on Vee's arm and, with the sincerest concerned look on his face, said, "I'm worried for you." Truth be told, we were worried for us, too, kind sir.

But what do you know, we went home and three days later the new toilet was installed. When we turned on the water supply and saw the toilet bowl filling up and there was no leak at all anywhere, I'm telling you, "magical" was the word that popped up in my head.

It's like in html-coding class when I finish writing all the code and hit Enter...then wait nervously for either the finished page or an error message to appear on the screen...and then joy of joys, the page I've been working on appears in all its glory and I don't have to spend the rest of the day staring at nonsensical rows of letters and numbers looking for the one dot I missed.

We had to wait for the tank to finish filling up to try flushing, so we worked on the living room while waiting. When we heard the water stop, I swear there was jumping and joyous exclamations. We literally ran to the bathroom and promptly took a picture of our magical toilet's maiden flush.

See, no leak!

I only wish the Rona dude could see it so we can all gaze proudly at the porcelain miracle.

Saturday, March 19, 2011

I Wish I Could See the Past

When we were looking at properties for sale, we knew what was important was the bones of the place: room layouts, whether there was laundry hook-up in-suite, etc. So we fell in love with the unit that is now ours because it had a walk-in wardrobe, a huge sundeck and a gas fireplace (bonus: gas is included in the condo maintenance fee). 

It was only the second or third time we went to the apartment that I realized there was something unusual about the previous owners' decor preferences. Orange walls, for starters. 


The apartment has a different color in almost every room. In the adjoining kitchen, which is essentially partially open to the orange living/dining room, the walls are light blue (although you can't really see it very clearly in this photo).


And that's the same color as the bedroom (hey, I said "almost" every room).


The bathroom walls are purple, with blue tiles on the bathtub surround. I actually don't mind this color combination.


Although I do kinda mind the movie-star lighting...


And the wardrobe/laundry room, which connects the purple bathroom to the blue bedroom, has white walls.


When we dug the contents of the storage locker, which is outside our unit, we found, shall we say, interesting decor items. Case in point, this larger-than-life profile portrait of an Indian man. Note its size relative to Vee's freakishly large hand (his pinky is the long-lost identical twin of my index finger).

 
When I asked Vee to hold his hand by the picture for size comparison, he decided it would be funny to put his finger there and then giggled like a schoolboy. I did a quick Google image search to check if the Indian man was in fact a religious figure, just so I wouldn't offend anyone with the photo. Try as I might, I couldn't find anything on the man in the photo. Which confuses me: if he's not anyone famous, then what's he doing on a that monstrously-sized canvas?

Or maybe he's the previous owner? Note to self: ask neighbors about ethnicity of previous owner. And whether he had a mustache.

We also found this drawing, which wouldn't look out of place in my grandma's home.

 
And this strange mesh of serene coastal scene, wild tribal design and textured wood.


I so wish I could see the apartment in all its huge-portraits-and-kitten-drawings-and-wooden-beach-pictures glory.